

This project simulates a smart car parking system for managing parking spaces efficiently. Using two IR sensors, a servo motor, and an I2C LCD display, the system tracks the availability of parking slots and automates the gate's opening and closing. The parking slot count is updated dynamically and displayed on the LCD. If all slots are occupied, the gate will not open for new cars.
Working Principle
Car Entry:
- Sensor 1 detects the car approaching the entry gate.
- The gate opens using a servo motor.
- The car moves past Sensor 2, which signals the system to close the gate and reduce the number of available parking slots by 1.
Car Exit:
- Sensor 2 detects the car approaching the exit gate.
- The gate opens using the servo motor.
- The car moves past Sensor 1, which signals the system to close the gate and increase the number of available parking slots by 1.
Parking Full Condition:
- If all slots are occupied, the system prevents the gate from opening for entry and displays "Parking Full" on the LCD.
Hardware Requirements
- Arduino UNO - 1
- IR Sensor Modules - 2 (for entry and exit)
- Servo Motor - 1 (for gate control)
- I2C LCD Module (16x2) - 1
- Power Supply (5V)
- Jumper Wires
- Breadboard
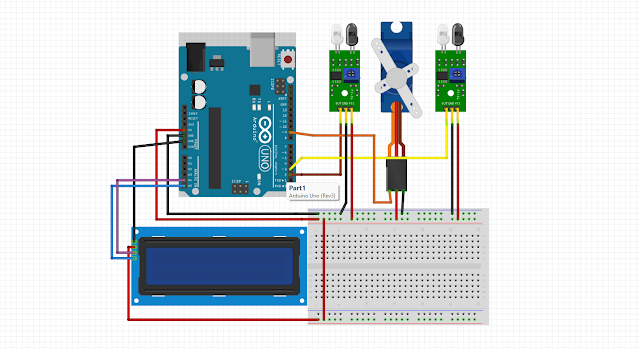
Circuit Diagram
Here’s how the components are connected:
Connections:
IR Sensor 1 (Entry):
- VCC → 5V
- GND → GND
- OUT → D2 (Arduino Pin 2)
IR Sensor 2 (Exit):
- VCC → 5V
- GND → GND
- OUT → D3 (Arduino Pin 3)
Servo Motor:
- VCC → 5V
- GND → GND
- Signal → D9 (Arduino Pin 9)
I2C LCD:
- SDA → A4 (Arduino Pin A4)
- SCL → A5 (Arduino Pin A5)
- VCC → 5V
- GND → GND
Circuit Diagram
Video Link: - Click Here For Video
How To Make Smart Car Parking System using Arduino UNO DIY Project by WTC Zone simple Circuit: -

Arduino IDE Program
Code for Smart Car Parking System using Arduino UNO DIY Project by WTC Zone
#include <Wire.h>#include <LiquidCrystal_I2C.h>#include <Servo.h>
// Initialize LCD (I2C address 0x27, 16x2 display)LiquidCrystal_I2C lcd(0x27, 16, 2);
// Define pins#define IR_SENSOR_IN 2   // IR sensor 1 (entry)#define IR_SENSOR_OUT 3  // IR sensor 2 (exit)#define SERVO_PIN 9      // Servo motor pin
// Parking lot detailsint totalSlots = 5;     // Total parking slotsint availableSlots = 5; // Slots initially available
// Servo objectServo gate;
// State trackingbool gateOpen = false; // Tracks if the gate is openunsigned long debounceDelay = 2000; // Debounce time (ms)unsigned long lastSensorTrigger = 0;bool sensor1State = false; // Track Sensor 1 statebool sensor2State = false; // Track Sensor 2 state
void setup() {  // Initialize LCD  lcd.init();  lcd.backlight();  lcd.setCursor(0, 0);  lcd.print("Parking System");  delay(2000);
  // Setup pins  pinMode(IR_SENSOR_IN, INPUT);  pinMode(IR_SENSOR_OUT, INPUT);  gate.attach(SERVO_PIN);
  // Initialize servo to closed position  closeGate();
  // Display initial parking slots  updateDisplay();}
void loop() {  // Read the state of the sensors with debouncing  bool sensor1 = digitalRead(IR_SENSOR_IN) == LOW;  bool sensor2 = digitalRead(IR_SENSOR_OUT) == LOW;
  // If Sensor 1 (entry) detects car and debounce delay is passed  if (sensor1 && !sensor1State && (millis() - lastSensorTrigger > debounceDelay)) {    if (availableSlots > 0) { // Check if parking slots are available      openGate();         // Open the gate      lastSensorTrigger = millis(); // Reset debounce timer      sensor1State = true; // Set sensor1 state to true (car detected)
      // Wait until the car reaches Sensor 2      while (digitalRead(IR_SENSOR_OUT) == HIGH) {        delay(10); // Keep the gate open while waiting for Sensor 2      }
      // Once Sensor 2 detects the car, update count and close the gate      availableSlots--; // Decrease available slots      updateDisplay();      closeGate();    } else {      lcd.setCursor(0, 1);      lcd.print("Parking Full   "); // Show parking full message    }  }
  // If Sensor 1 state was true and it no longer detects the car  if (!sensor1 && sensor1State) {    sensor1State = false; // Reset sensor1 state when the car has passed  }
  // Detect car exiting (Sensor 2 → Sensor 1)  if (sensor2 && !sensor2State && (millis() - lastSensorTrigger > debounceDelay)) {    openGate();         // Open the gate    lastSensorTrigger = millis(); // Reset debounce timer    sensor2State = true; // Set sensor2 state to true (car detected)
    // Wait until the car reaches Sensor 1    while (digitalRead(IR_SENSOR_IN) == HIGH) {      delay(10); // Keep the gate open while waiting for Sensor 1    }
    // Once Sensor 1 detects the car, update count and close the gate    if (availableSlots < totalSlots) {      availableSlots++; // Increase available slots      updateDisplay();    }    closeGate();  }
  // If Sensor 2 state was true and it no longer detects the car  if (!sensor2 && sensor2State) {    sensor2State = false; // Reset sensor2 state when the car has passed  }}
// Function to update the LCD displayvoid updateDisplay() {  lcd.clear();  lcd.setCursor(0, 0);  lcd.print("Slots Left:");  lcd.setCursor(0, 1);  lcd.print(availableSlots);  lcd.print("/");  lcd.print(totalSlots);
  // Display "Parking Full" if no slots are available  if (availableSlots == 0) {    lcd.setCursor(0, 1);    lcd.print("Parking Full   ");  }}
// Function to open the gatevoid openGate() {  gate.write(0);   // Open position  gateOpen = true; // Mark gate as open}
// Function to close the gatevoid closeGate() {  gate.write(90);   // Closed position  gateOpen = false; // Mark gate as closed}
Share, Support, and Subscribe!!! 1. PRO KAM EXPLAINED 2. Knowledge KAM 3. PRO KAM Follow us on 1. Facebook 2. Instagram 3. Pinterest 4. Blogspot 5 Twitter If you have any other ideas to make me design, you can describe them in the comment section and if I can, I will make a designing video on it. So I am waiting #prokam #wtc #Arduino #ideas #projects #diy #how #to #ArduinoProjects #UltrasonicSensor #HeightMeasurement #TechDIY #WeTechCreators #wtczo


0 Comments